Witch’s Cauldron Cake Pops are rich chocolate cake pops dressed up for Halloween with bubbling candy, creepy eyeballs, gummy worms and little red flames. They’re ridiculously fun to make, even more fun to decorate, and exactly the kind of Halloween dessert that looks like you worked much harder than you actually did.
Halloween is one of those holidays I love despite having absolutely no interest in being scared.
Haunted houses? No.
Horror movies? Hell no.
I have access to the local news and an electric bill; I have enough anxiety. Creepy food, however, I can absolutely get behind.
These Witch’s Cauldron Cake Pops are little chocolate cake pops transformed into bubbling cauldrons, complete with candy eyeballs, gummy worms, toffee bits and whatever other disturbing edible things you feel like throwing on top. They’re creepy without requiring me to watch somebody crawl backward down a staircase, which is exactly where I like my Halloween festivities.
And underneath all the witchcraft? They’re just really damn good chocolate cake pops.
Halloween Cake Pops That Are Actually Fun to Make
I love Halloween food because subtlety isn’t required. Actually, subtlety is discouraged.
This is your opportunity to take perfectly respectable chocolate cake, mash it up with frosting, dip the whole thing in more chocolate and then stick eyeballs and worms all over it. Nobody questions your judgment because it’s festive.
The basic cake pop mixture is simple: chocolate cake mixed with chocolate frosting until you have a soft, moldable mixture. Instead of making traditional round cake pops, I shape these so they’re slightly wider across the top, giving them more of that little cauldron shape.
Then comes the fun part. Chocolate coating turns them black—or at least appropriately dark and witchy—and the tops become a free-for-all of Halloween candy.
- Candy eyeballs.
- Gummy worms.
- Toffee pieces.
- Sprinkles.
- Tiny bones.
- Green candy.
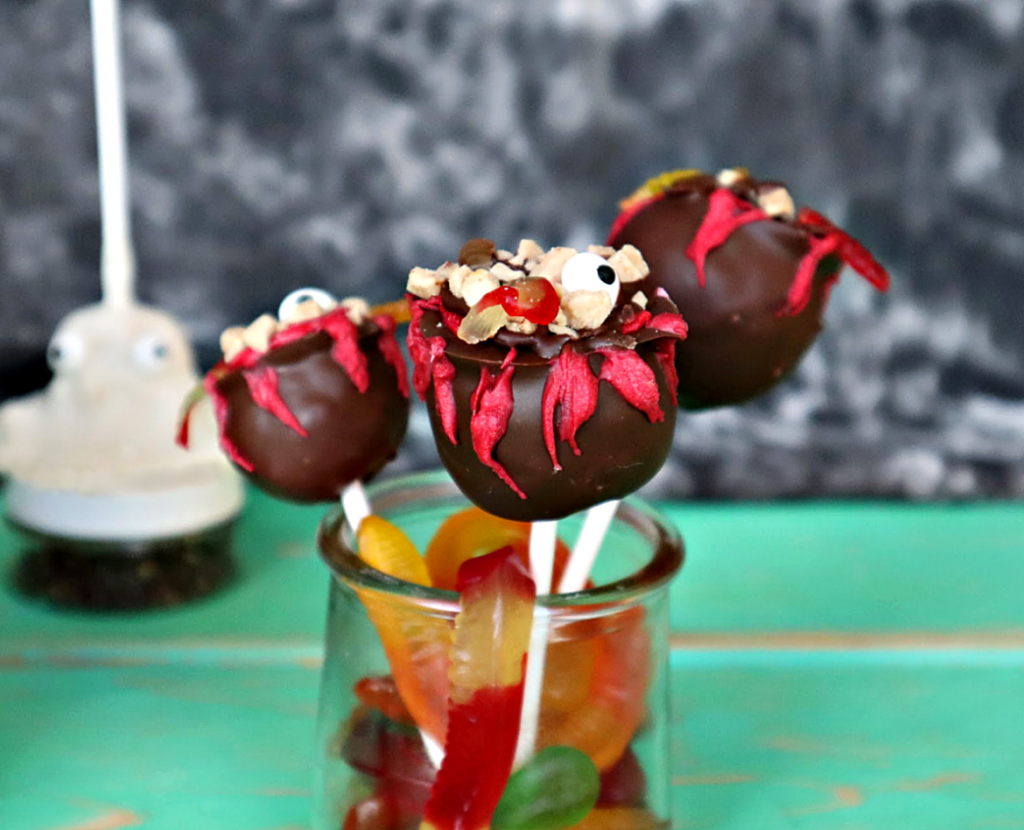
Whatever looks like it might reasonably be simmering in a witch’s cauldron is fair game. This just isn’t the time for restraint.
How to Make Witch’s Cauldron Cake Pops
Start by baking your chocolate cake according to the package directions and let it cool completely. And I do mean completely. Trying to make cake pops with warm cake is an excellent way to create a sticky chocolate crime scene. Once it’s cool, crumble the cake into a large bowl. You want fairly fine crumbs without a bunch of big pieces hanging around.
Add the chocolate frosting a little at a time and work it into the cake crumbs.
Don’t Add All the Frosting at Once
This is probably the most important thing I’ve learned about making cake pops. You may not need the entire container of frosting.
Cake mixes vary, frosting containers vary, humidity varies and apparently cake pops have opinions. Start with roughly half the frosting and mix it thoroughly before adding more. The finished mixture should hold together easily when you squeeze it in your hand, but it shouldn’t feel wet, greasy or overly sticky.
Too much frosting makes the cake pops soft and heavy, which makes them much more likely to slide down the sticks or fall apart when you dip them. And watching your carefully shaped witch cauldron commit suicide directly into a bowl of melted chocolate is irritating as hell.
Ask me how I know.

Shape and Chill the Cake Pops
Roll the cake mixture into balls, then gently shape each one into a tiny cauldron. They don’t have to be identical. They’re witch cauldrons, not macarons.
Once they’re shaped, put them on a parchment-lined baking sheet and chill them until they’re firm. Chilling makes them much easier to dip and decorate, but you don’t want them frozen solid. Extremely cold cake pops meeting warm melted chocolate can cause the coating to crack.
We want spooky. We do not need structurally compromised.
How to Keep Cake Pops From Falling Off the Stick
Here’s a little insurance policy that takes about five seconds. Before inserting the cake pop stick, dip the very end of it into your melted chocolate coating. Then push it about halfway into the cake pop.
That little bit of chocolate hardens around the stick and essentially glues everything together. Let those set briefly before dipping the entire cake pop. It makes a huge difference, especially with these because they’re a little more substantial than your average tiny cake pop.
Dip and Decorate Your Cauldrons
Melt your chocolate coating according to the package directions and transfer it to a container deep enough to dip the cake pops easily. Dip each cauldron straight down into the chocolate until completely covered, then lift it straight back out.
Try not to stir it around in the chocolate. That puts unnecessary pressure on the cake pop and increases your chances of losing it. Gently tap off the excess coating. Then, while the chocolate is still wet, decorate the top of your cauldron. This is where things can get delightfully weird.
I used candy eyeballs, gummy worms and toffee pieces, but you can absolutely raid the Halloween candy aisle and improvise. Green sprinkles or candy melts can make the cauldron look like it’s bubbling over with some toxic witch concoction. Candy bones would be fantastic. Tiny skulls? Obviously.
If it looks vaguely disgusting but tastes like sugar, throw it on there.

Don’t Forget the Flames.
The little flames underneath are one of my favorite parts because they make the whole thing actually look like a tiny cauldron sitting over a fire. Use melted red candy coating to create little flame shapes on parchment paper and let them harden. Go here to get my favorite parchment paper – it’s a great deal and will last you a while.
Once they’re set, arrange the flames underneath the finished cake pops. It’s such a small detail, but it takes them from “cute Halloween cake pop” to tiny bubbling vessel of questionable witchcraft. Which is clearly the goal.
A Few Cake Pop Tips Before You Start
There are a handful of things that make cake pops infinitely less annoying.
Let the cake cool completely. Warm cake and frosting will give you a mixture that’s far too soft.
Add the frosting gradually. You can always add more. You cannot un-frost a cake.
Chill before dipping. Firm cake pops hold their shape better and are less likely to fall off the sticks.
Use a deep, narrow container for dipping. You want enough depth to submerge the cake pop without having to roll it around.
Don’t overheat the chocolate coating. It should be smooth and fluid, not thick and scorching hot.
Decorate while the coating is wet. Once that chocolate sets, your gummy worm isn’t sticking to a damn thing.
Can You Make Halloween Cake Pops Ahead of Time?
Absolutely.
In fact, the these are a great make-ahead Halloween dessert because you can break the process into stages. Bake the cake a day ahead if you want. Once cooled, keep it covered until you’re ready to make the cake pop mixture. You can also shape the cake pops ahead of time and refrigerate them in an airtight container before dipping.
Finished cake pops can be stored in an airtight container in a cool room for a couple of days, or refrigerated if you need to keep them longer. If you refrigerate finished cake pops, let them gradually come back toward room temperature before serving. Sudden temperature changes can create condensation on the coating.
Nobody wants a sweaty cauldron.
Halloween Party Dessert, Handled
These Witch’s Cauldron Cake Pops are exactly what I want from Halloween food. They’re chocolate. They’re slightly ridiculous. They’re customizable.
And they’re creepy enough to make everybody happy without requiring me to spend October pretending that being chased through a cornfield by a man with a chainsaw sounds recreational. Make them for a Halloween party, take them to work, make them with the kids or keep the entire batch at home and tell everybody they fell into the cauldron.
Look, I’m here to tell you that if you’re going to celebrate Halloween, sticking gummy worms and eyeballs into chocolate cake is considerably a much better use of your evening than watching The Exorcist.
There are some lines I simply will not cross.
Here’s your printable –

Witch's Cauldron Cake Pops
Witch’s Cauldron Cake Pops are chocolate cake pops loaded with creepy candy, gummy worms and eyeballs for a wickedly fun Halloween dessert.
Ingredients
- 1 box chocolate cake mix
- 8 oz. cream cheese frosting
- 1 lb. coating/dipping chocolate wafers or chips
- Candy eyeballs
- Candy worms
- Heath candy toffee bits
- Assorted food colors - make sure you have red
- Sucker or cake pop sticks
Instructions
- Bake cake according to package directions, allow to cool to room temp.
- Crumble cooled cake into a large bowl. Add about half of the chocolate frosting and combine thoroughly. Continue adding frosting a few tablespoons at a time until the mixture holds together easily when shaped. You may not need the entire container.
- Using a tablespoon scooper, make 20-25 cake pops and refrigerate until ready to decorate.
- Melt chocolate wafers according to package directions.
- Stick each cake pop with a pop stick in the center.
- Dip each cake pop in melted chocolate until coated, place on wax paper.
- Decorate by either piping red icing around the sides of the top of pops to make flames.
- Dot the tops of cake pops with chocolate, add candy eyes, worms, toffee bits, etc. to make top of cauldron.
- Allow to dry.
Recommended Products
We are a participant in the Amazon Services LLC Associates Program, an affiliate advertising program designed to provide a means for us to earn advertising fees by linking to Amazon.com and affiliated websites.