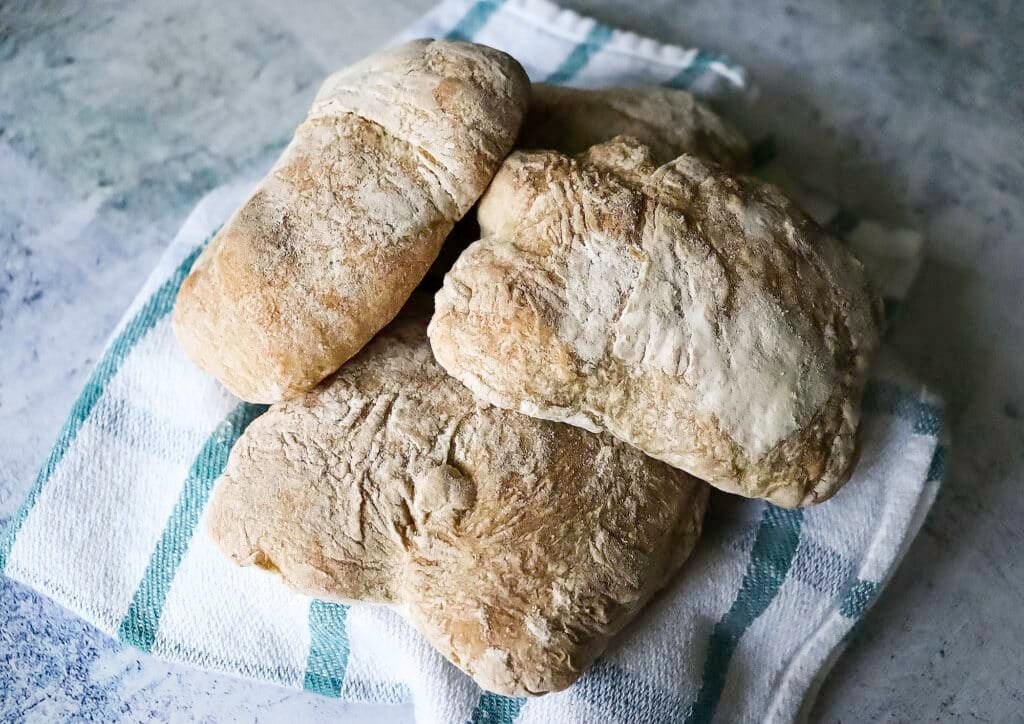
Ciabatta – that chewy, crusty, perfect-for-sandwiches Italian bread that somehow manages to be rustic and bougie at the same time. It’s soft on the inside and is known for its interior holes. Although this is a time consuming bread to make (2 days), it’s not specifically labor intensive.
The bread equivalent of wearing linen to brunch. People think it’s hard. But let me be the one to pull back the curtain and say: yeah, okay, it’s a little fussy. But hard? Not really. You just need some patience, a stand mixer, and a mildly unhealthy relationship with carbs. Lucky for you, I’ve got all three.
Now, before you panic and click away to go scroll through TikTok recipes that require exactly three ingredients and zero soul, hear me out. Ciabatta takes time, yes. But it’s not like you’re kneading it for hours or scaling the Alps barefoot.
We’re mixing, resting, folding, ignoring, and then – bam! – golden loaves that look like you bought them at some overpriced artisanal bakery that also sells local honey and hand-thrown pottery.

What Even Is Ciabatta?
Ciabatta means “slipper” in Italian, which makes sense once you see the shape. It’s long, flat-ish, and has those lovely bubbles inside that just beg for olive oil and balsamic or a thick schmear of butter (or both, let’s be real).
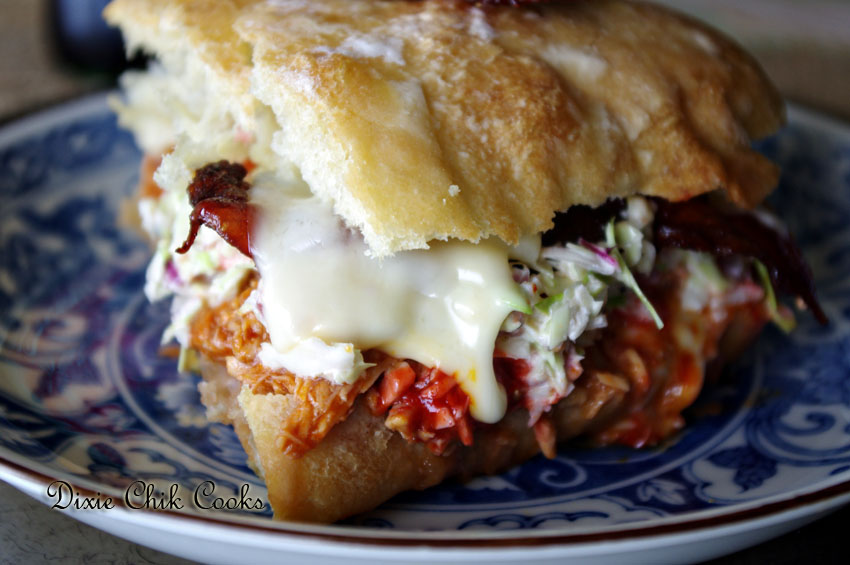
Ciabatta is the bread you want for paninis. It’s the bread that makes you feel like you’re in a Tuscan villa when in reality, you’re just avoiding laundry in your Alabama kitchen. It’s aspirational, and we love that in a carb.
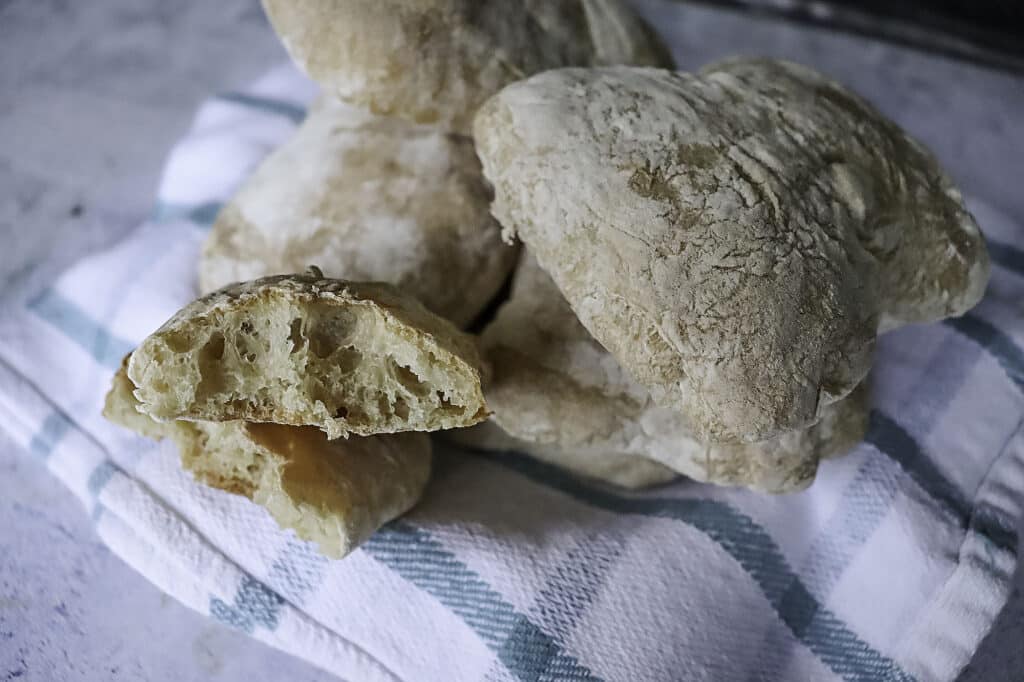
Ciabatta has that classic open crumb, chewy center, and shatter-crisp crust that makes you feel like you could open a bakery in Tuscany even though you’re really just avoiding laundry in your Alabama kitchen. And honestly? It’s a little dramatic, this bread. It takes two days. It wants attention. It makes a mess. But it’s so worth it.

So let’s make some. We’re doing this over two days, which sounds dramatic but is honestly just a lot of waiting and one weird foldy step that makes you feel like you’re in a PBS cooking show from 1997. You in? Let’s go.
The Secret Sauce: Biga
If you’re asking, “What in the hell is a biga?” then you’re in good company – I said the same thing the first time I tried to make this bread and thought it was a typo. But no, biga is real. It’s Italy’s answer to a sourdough starter but way less high-maintenance. You don’t have to name it or keep it alive for the rest of your natural life. You just mix, wait, and go about your business.
Day 1: Biga, Baby
This is the easiest part, you’ll feel so smug. These ingredients will go into your stand mixer:
Bread flour – I use King Arthur, but Bob’s Red Mill has great flour, too. Bread flour has a higher protein content, which produces a chewier bread with a strong rise and good structure. All-purpose will work if that’s all you have, but your result won’t be as quite as good.
Instant yeast – I have been using Saf-Instant yeast for the past 5 years or so after using whatever I could find at the grocery store for years. This yeast is superior and I have great results every single time. I keep it in the freezer and a regular size pouch lasts forever.
Room temp water (somewhere between “lukewarm bath” and “forgot your coffee”)
Stir it all up. You’ll get a sticky blob that doesn’t look like much. That’s fine. That’s correct. Cover it tightly and let it hang out on your counter for 8 to 24 hours. Yes, you read that right. Just leave it. Walk away. Let the magic happen while you live your life (or get on FB and watch others live theirs).
By the next day, it should smell a little boozy, a little sour, and have bubbles that say, “I’m alive!”.
Day 2: The Actual Ciabatta Part
Now that your biga is nice and funky (in a good way), it’s time to bring out the big guns: your stand mixer. If you’re trying to do this by hand, I admire you, but also, just don’t.
In the bowl of your stand mixer:
Whisk together the instant yeast and warm water (100–110°F, like a hot tub for yeast).
Let it sit for 10 minutes, just to prove it’s still got it.
Add your biga blob, bread flour, and salt.
Mix on medium with the dough hook until everything comes together. Warning: this dough is STICKY. Like, “I think I accidentally glued my hand to the countertop” sticky. That’s good. Don’t panic. Sticky dough = beautiful bread.
Cover the bowl and let it sit for 30 minutes. I know, more waiting. This bread is basically a lesson in patience disguised as a carb.
Stretch It Real Good
Here’s where it gets oddly satisfying. You’re going to “stretch and fold” the dough. This sounds a little extra, but it’s basically bread yoga.
Grab a section of dough from the side, pull it up, then fold it over itself.
Turn the bowl a quarter turn and repeat.
Do this 8-ish times total, like you’re tucking your dough into bed.
Cover it again and let it rise for an hour. Then do the stretch-and-fold thing one more time, because this dough is needy.
Now, stick the whole bowl in the fridge. You can bake it in an hour, or let it chill up to 24 hours. This is the one time in the process where ciabatta actually cuts you some slack.
Shaping the Dough
Ready to bake? Let’s make a mess.
Flour your work surface like you’re dusting for fingerprints. Be generous.
Oil or flour your hands (remember, this dough is like a stage-five clinger).
Gently plop the dough out of the bowl and coax it into an 8×10 rectangle.
Using a bench scraper or a pizza wheel in a pinch, cut it in half to make two loaves. No shaping, no rolling—this is rustic, remember? Now, at this point you need to decide if you’re making two loaves of bread or 8 buns. If it’s loaves, then carry on. If you want rolls, continue halving the halves until you have 8 ciabatta rolls.
Transfer the loaves onto a piece of parchment paper, sprinkle them with more flour (because why not), and cover them with a clean tea towel. Let them rise one last time for an hour.
You’ll know they’re ready to bake when you poke the dough and the indentation lingers for a few seconds. If it springs back immediately, go do something else for 15 minutes and try again.
The Oven: A Hot Date
Preheat your oven to 500°F. Yes, 500. We’re not messing around. Put a baking sheet or stone inside while it heats up—you want that thing screaming hot when the dough hits it. You will see many ciabatta recipes that bake theirs at 400 or 425. I’ve made this many times and found that the higher the temp, the better that contrast of soft, chewy inside and crusty outside is. I hope that makes sense.
When everything’s ready, grab the edges of the parchment paper and slide it (loaves and all) onto your hot pan or stone like you’ve done this a hundred times. Bake for 20 to 25 minutes until they’re golden brown and sound hollow when tapped.
Now comes the hardest part: waiting.
Let the loaves cool for at least 45 minutes before slicing. Yes, really. I don’t care how good it smells. Cutting too early will ruin the texture you just spent two days creating. Find something to do, and keep your hands off the bread.

Once cool, slice it open and marvel at those glorious air pockets. This is the kind of bread that demands good olive oil, fresh mozzarella, maybe a little soppressata. Or just toast it and slather it with butter and flaky salt and pretend you’re on a terrace in Florence instead of your back porch next to a citronella candle.
Ciabatta is a commitment. It’s a project. But it’s also one of the most rewarding loaves to bake at home, especially when you nail that crackly crust and chewy interior. Plus, it freezes beautifully (if it lasts that long), and makes the best panini you’ve ever had.
So the next time someone says, “Bread is just empty calories,” slap a slice of this in their hand and let the gluten do the talking.
You made this. You deserve a standing ovation and a nap. Make sure to tag me with your photos on Insta, FB or Pinterest – I’m here for all of them.
Want more baking therapy? Subscribe to my newsletter, Whisk, Please, where we believe in real talk, real butter, and not apologizing for a third slice.
Here’s your printable –
Ciabatta
Chewy, crusty, perfect-for-sandwiches Italian bread that somehow manages to be rustic and bougie at the same time. This is a two-day recipe process, but very doable!
Ingredients
FOR THE BIGA:
- 1 cup bread flour
- 1/8 tsp instant yeast
- ½ cup room temp water (70-80 degrees)
FOR THE CIABATTA:
- 1 tsp instant yeast
- 1 cup warm water (100-110 degrees)
- 2 ½ cups bread flour, plus more as needed
- 1 ½ tsp salt
- ¼ cup Olive Oil
Instructions
DAY 1:
- In a large bowl combine flour and yeast, then add the water.
- Cover tightly and let rest at room temp for 8-24 hours.
DAY 2:
- In the bowl of a stand mixer fitted with dough hook attachment whisk together yeast and warm water and let sit for 10 minutes.
- Add the biga, flour and salt, then mix on medium until the dough is no longer dry. Keep in mind the dough will be sticky and that is normal.
- Cover and let dough rest for 30 minutes at room temp.
- Uncover dough. At this point, it's time to fold - grab a section of dough from one side, pull it up then fold it over itself, turn the bowl ¼ of the way and repeat the fold 8 more times, turning the bowl ¼ of the way in between folds.
- Cover dough again and let rise for another hour. Repeat the stretch and folding, cover and refrigerate for an hour and up to 24 hours.
- Flour your work surface and using oiled or floured hands transfer dough from bowl to work surface.
- Shape the dough into a 8x10 rectangle, then cut it in half using a bench scraper. You can stop here to make loaves, or cut the dough into 8 rolls (roughly).
- Transfer the dough to a sheet of parchment paper, sprinkle with flour and cover with a clean tea towel to let rise for one more hour.
- The dough is ready to bake when an indention made with your fingertip stays visible for a few seconds and does not immediately spring back.
- While dough is rising preheat oven to 500° with a baking sheet or stone in the oven so it preheats as well. When preheated, slide parchment paper with dough quickly onto preheated pan or stone and bake for 20-25 minutes until golden brown.
- Let bread rest for at least 45 minutes before cutting.
Recommended Products
We are a participant in the Amazon Services LLC Associates Program, an affiliate advertising program designed to provide a means for us to earn advertising fees by linking to Amazon.com and affiliated websites.
-
 The King Arthur Baking Company's All-Purpose Baker's Companion (Revised and Updated)
 - Caraway Non-Stick Ceramic Baking Sheet - Naturally Slick Ceramic Coating - Non-Toxic, PTFE & PFOA Free - Perfect for Baking, Roasting, and More - Large (18" x 13") - Gray
- Bread Warmer Basket with Stone - Includes Linen Towel and Clips


Nutrition Information:
Yield: 8 Serving Size: 1 Amounts Per Serving: Calories: 278Total Fat: 8gSaturated Fat: 1gTrans Fat: 0gUnsaturated Fat: 6gCholesterol: 0mgSodium: 439mgCarbohydrates: 44gFiber: 2gSugar: 0gProtein: 7gThe provided nutrition calculated may not always be accurate.
